Lesson 2: Injecting an agents into a Network

Example Agilla agents can be found in $AGILLA/agents. Read the README file within this directory for a description of each agent.

Configuring the AgentInjector

The AgentInjector searches for an agilla.properties file in the directory from which you launched it. This file contains local settings. Possible settings and their default values are listed below.

initDir specifies the initial directory to display when opening a mobile agent. defaultAgent specifies the agent that is automatically loaded when AgentInjector is launched. runTest specifies whether a test should be run. This is used only for experimental purposes. numCol specifies the number of columns there are in the network. This affect the addressing scheme within the network and is only used when grid routing is enabled in Makefile.Agilla. enableClustering controls whether clustering is enabled. Clustering is used in Agilla's location directory service. By default, clustering is disabled. nwName specifies the name of the network. This is used when there are multiple Agilla networks running and a single directory service spans multiple networks. The default value of this is unknown.

Injecting an Agent

  1. Run the Agent Injector from within the directory that you created your agilla.properties file. The example below assumes that this file is located in $AGILLA.

    $ cd $AGILLA
    
    $ java agilla.AgentInjector -comm COM1:57600

    Note that you can add a '-d' to the end of the command that launches the AgentInjector to enable debug output. Also, adjust the serial port and baud rate to match your specific platform.

    If launched correctly, the following AgentInjector GUI will appear:
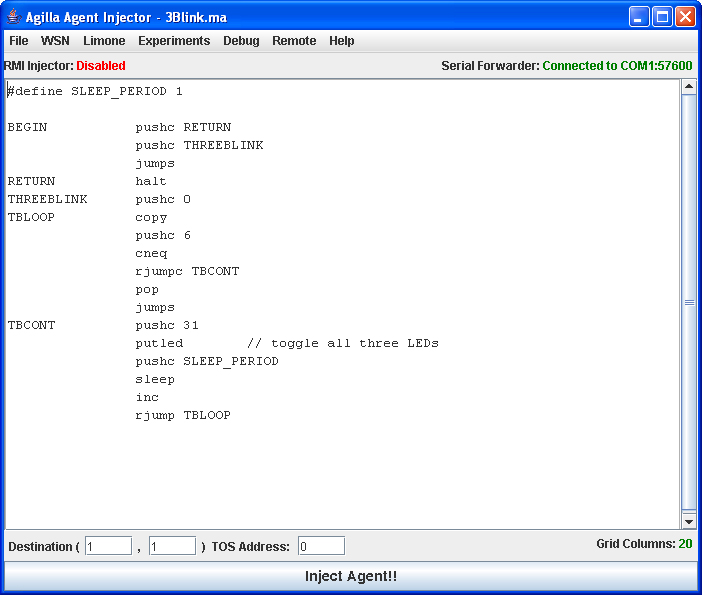


    Note that 3Blink.ma is automatically loaded. This is because 3Blink.ma is specified as the default agent within the agilla.properties file. Of course, if you customized your agilla.properties file, it will display whatever agent you specified.

  2. The instructions shown in the main text area are the 3Blink agent's. 3Blink simply blinks all 3 LEDs three times and then terminates. Below this text area is a panel that allows you to specify which location to inject the agents into. Currently, it's set to node (0,0) which has TinyOS Address of 0. The location and TinyOS Address are related as described here. If this is not correct, check the size of the network by going to WSN and selecting Grid Size.

  3. Assuming you have a mote with TinyOS 0 attached to the programming board, hit the button labelled "Inject Agent!" at the bottom of the Agent Injector. When doing this, look at the LEDs of the mote, all three should blink three times. This indicates that the agent has been injected into the network and it works.

  4. Suppose you want to inject an agent into a mote that is not directly attached to the programming board. Suppose that this remote mote has TinyOS address 1. You can program an agent to migrate onto mote 1. An example is given in $AGILLA/agents/Move2Mote1.ma and is displayed below:

    // This agent blink all three LEDs, migrates to mote 1, and
    // then blinks all three LEDs again.
    //
    // It should be injected onto the mote that is directly 
    // attached to the programming board.
    //
    // Author: Chien-Liang Fok
    
    
    #define SLEEP_PERIOD 10
    
    BEGIN		pushc 31
            	putled        // toggle all three LEDs        
            	pushc SLEEP_PERIOD
            	sleep
            	pushc 31
            	putled        // toggle all three LEDs   
            	pushc 1
            	smove         // strong move to mote 1
            	pushc 31
            	putled        // toggle all three LEDs        
            	pushc SLEEP_PERIOD
            	sleep
            	pushc 31
            	putled        // toggle all three LEDs
            	halt
    

    Inject this agent onto the mote that is attached to the programming board and observe the LEDs in your network. Assuming Mote 0 is attached to the programming board, you should see Mote 0's LEDs blink once, then the LEDs on mote 1 blink once. This demonstrates how an agent can migrate onto a remote node.
  5. You can modify 3Blink.ma to also migrate onto mote 1, which is one hop away from the programming board. The modified version is given in $AGILLA/agents/3Blink_Move1.ma and is displayed below:

    // This agent blinks the LED three times on the mote that is
    // attached to the base station, then migrates onto mote 1.
    // Once it arrives at mote 1, it blinks its LEDs again three
    // times.
    //
    // Author: Chien-Liang Fok
    
    
    #define SLEEP_PERIOD 1
    
    BEGIN			pushc RETURN1
    		    	pushc THREEBLINK
    				jumps             // blink LEDs three times
    RETURN1		pushc 1
    				smove             // strong move to mote 1
    				pushc RETURN2
    				pushc THREEBLINK
    				jumps             // blink LEDs three times
    RETURN2		halt
    THREEBLINK  	pushc 0
    TBLOOP  		copy
            		pushc 6
            		cneq
            		rjumpc TBCONT
            		pop
            		jumps
    TBCONT  		pushc 31
            		putled        // toggle all three LEDs        
            		pushc SLEEP_PERIOD
            		sleep
            		inc
            		rjump TBLOOP	
    
    Inject this agent onto the mote that is attached to your programming board. Observe how the agent blinks the LEDs three times, migrates onto mote 1, and then blinks all three LEDs three times again.
Last Updated on April 8, 2008 11:10 AM .

This work is supported by the ONR MURI Project CONTESSA and the NSF under grant number CCR-9970939.